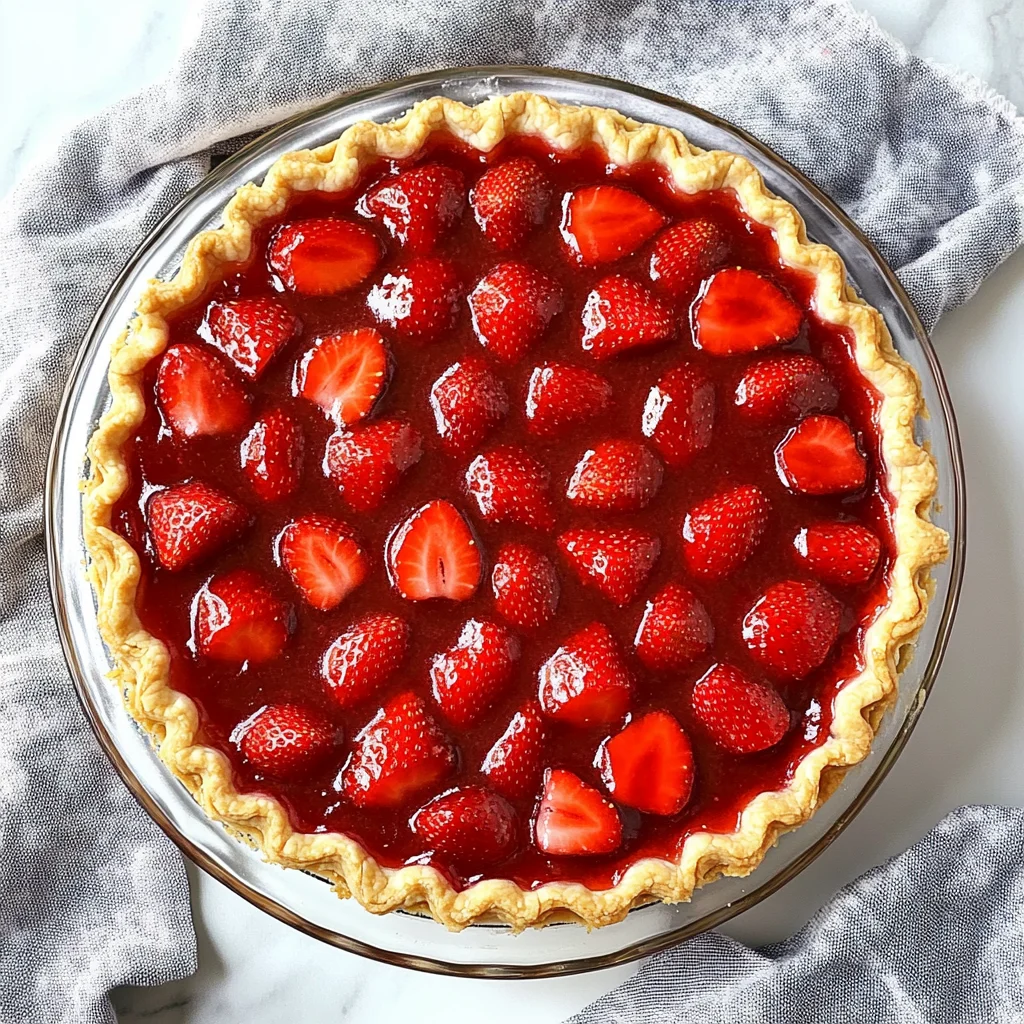
Imagine a slice of strawberry pie, where the sweet, juicy strawberries glisten under a light glaze and rest upon a buttery, flaky crust that crumbles ever so gently with each bite. The air is filled with the delightful aroma of fresh strawberries mingling with hints of vanilla and lemon, inviting you to indulge in this quintessential summer dessert.
As you prepare to create this delicious treat, you’ll find that making strawberry pie is not just about the end result; it’s a chance to connect with your loved ones over a shared experience in the kitchen. This recipe is simple yet rewarding, promising smiles and satisfaction as you serve up slices of sunshine that everyone will eagerly gather around. So roll up your sleeves and let’s dive into crafting this delightful dessert together!
Why You'll Love This Recipe
- This strawberry pie recipe is not only easy to follow, but it also bursts with fresh, vibrant flavors that will delight your taste buds.
- The stunning visual appeal of juicy strawberries glistening under a sweet glaze makes it a perfect centerpiece for any gathering.
- Whether served at a picnic or as a refreshing dessert after dinner, this pie is versatile enough to impress any crowd.
- You’ll find that each slice offers a delightful balance of sweetness and tartness, making it a favorite for everyone.
Now that you’re excited about the flavors, let’s dive into the detailed steps for creating your delicious strawberry pie.
Last summer, as I served the strawberry pie at our family picnic, the delighted cheers from my kids made all the effort worthwhile. Their smiles and laughter filled the air, creating a cherished memory that I’ll always hold dear. Now, let’s dive into how to make this delightful treat!
Essential Ingredients
To create a delightful strawberry pie, you’ll need fresh and quality ingredients that enhance the natural sweetness of strawberries.
1 cup all-purpose flour (sifted): Sifting the flour ensures a lighter texture for your pie crust, making it flaky and tender.
1/2 cup unsalted butter (cold and cubed): Using cold butter is crucial; it helps achieve those desirable flaky layers in the crust.
1/4 cup granulated sugar: This sugar not only sweetens the crust but also contributes to its overall browning during baking.
1/4 cup ice water (more if needed): Adding ice water gradually helps bind the dough without melting the butter, maintaining its flakiness.
1/4 teaspoon salt: A pinch of salt balances the sweetness of the pie crust, enhancing its flavor overall.
4 cups fresh strawberries (hulled and halved): Choose ripe, sweet strawberries for the best flavor; hulled and halved ensures even distribution in your filling.
1/2 cup granulated sugar (adjust based on sweetness of strawberries): Adjust this amount according to the natural sweetness of your strawberries to avoid an overly sweet filling.
2 tablespoons cornstarch (for thickening): This ingredient is essential for thickening the filling, preventing it from becoming runny after baking.
1 tablespoon lemon juice (freshly squeezed): Fresh lemon juice brightens the flavors and complements the sweetness of strawberries beautifully.
1/4 teaspoon vanilla extract: A touch of vanilla adds depth and enhances the natural flavors of the strawberry filling.
1/4 cup water: Water is used in the glaze to help combine ingredients smoothly while cooking.
1/4 cup granulated sugar: This sugar sweetens the glaze, adding a glossy finish to your pie’s appearance.
1 tablespoon cornstarch: Cornstarch in the glaze thickens it to create a perfect coating over your strawberries.
1 tablespoon lemon juice (freshly squeezed): The acidity from fresh lemon juice balances out sweetness in the glaze and enhances flavor complexity.
The full ingredients list, including measurements, is provided in the recipe card directly below.
As you gather these key components, let’s move on to preparing a delectable strawberry pie that will impress everyone!
Let’s Make It Together
Step 1: Prepare the Pie Crust:Begin by combining 1 cup of sifted all-purpose flour, 1/4 cup of granulated sugar, and 1/4 teaspoon of salt in a mixing bowl. The sweet aroma of sugar mingling with the flour will fill the air. Next, add in 1/2 cup of cold, cubed unsalted butter. Using a pastry cutter or your fingers, work the butter into the flour until it resembles coarse crumbs—think of a sandy texture that feels cool to the touch. Gradually add 1/4 cup of ice water, one tablespoon at a time, mixing just until the dough starts to come together. Avoid overworking it; we want that flaky texture! Shape the dough into a disc, wrap it in plastic wrap, and refrigerate for at least 30 minutes.
Step 2: Blind Bake the Crust:Preheat your oven to 375°F (190°C) while your dough chills. On a floured surface, roll out your chilled dough into a lovely 12-inch circle. Transfer this delicate crust to a 9-inch pie dish, pressing gently to fit the sides and bottom—feel free to admire how beautiful it looks! Prick the bottom with a fork to prevent bubbling and line it with parchment paper filled with baking weights or dried beans. Bake in your preheated oven for 15 minutes; you’ll notice a light golden hue developing. After removing the weights and parchment, bake for an additional 5 minutes until it’s lightly golden and fragrant. Let it cool completely—it’s going to be worth the wait!
Step 3: Prepare the Strawberry Filling:In a large bowl, combine 4 cups of hulled and halved fresh strawberries with 1/2 cup of granulated sugar, 2 tablespoons of cornstarch, 1 tablespoon of freshly squeezed lemon juice, and 1/4 teaspoon of vanilla extract. As you toss the strawberries gently to coat them evenly, enjoy their bright red color and sweet scent wafting up from the bowl. Let this mixture sit for about 10 minutes; this allows those luscious strawberries to release their juices—a key step for enhancing flavor.
Step 4: Make the Glaze:In a saucepan over medium heat, combine 1/4 cup of water, 1/4 cup of granulated sugar, 1 tablespoon of cornstarch, and another tablespoon of freshly squeezed lemon juice. Stir constantly as this mixture heats up; watch as it transforms from cloudy to clear while thickening beautifully—a smooth consistency that glistens in the light! Once thickened and just starting to bubble slightly (this usually takes about five minutes), remove it from heat and let cool slightly before using.
Step 5: Assemble the Pie:Now comes the exciting part! Pour your strawberry filling into the cooled pie crust, spreading it evenly so every slice is packed with juicy goodness. Drizzle that gorgeous glaze over your strawberries—take care to ensure they are all well coated; this will give them a shiny finish that’s simply irresistible! Refrigerate your masterpiece for at least two hours; patience is key here as we allow everything to set beautifully before serving.
Step 6: Serve:Once chilled and set, slice into your stunning strawberry pie and serve chilled. The moment you cut through that flaky crust revealing vibrant strawberries is pure bliss—enjoy every bite!
Now that you have created this delightful strawberry pie together, let’s dive into some tips for perfecting your pie baking skills!
You Must Know
- When making the pie crust, ensure the butter is cold and cubed; this helps achieve a flaky texture.
- I learned that patience pays off in perfecting the crust.
- Allow the strawberry filling to sit for about 10 minutes before pouring it into the crust.
- This step enhances the flavor and ensures a juicy filling, which I always appreciate in a pie.
- Refrigerate the assembled pie for at least 2 hours before serving to allow it to set properly.
- Trust me, this wait makes all the difference in presentation and taste.
Now that you have these essential tips, let’s dive deeper into the step-by-step process of preparing your delicious strawberry pie.
Add Your Touch
Feel free to customize your strawberry pie to suit your taste! Consider swapping in raspberries or blueberries for a mixed berry twist. For added depth, a sprinkle of cinnamon in the filling can enhance the flavors beautifully. If you like a touch of richness, try adding a dollop of cream cheese or mascarpone to the filling before pouring it into the crust. Remember, this recipe is a canvas for your creativity—experiment with confidence and make it your own!
Now that we’ve explored customization options, let’s delve into the essential steps for preparing your delicious strawberry pie.
Storing & Serving
To keep your strawberry pie fresh and flavorful, store it in the refrigerator, where it will stay delicious for up to 3 days. For the best serving experience, slice the pie just before serving to maintain its structure and presentation. Enjoy the pie chilled, allowing the bright flavors of fresh strawberries to shine through. Next, let’s explore some delightful variations you can try!
Chef's Helpful Tips
- 1. To prevent a soggy pie crust, ensure that your crust is cooled completely before adding the strawberry filling. This allows the crust to maintain its crispiness against the juicy strawberries.
- When making the filling, feel free to adjust the sugar based on the sweetness of your strawberries. Taste a few berries first; if they’re extra sweet, you might reduce the sugar for a more balanced flavor in your strawberry pie.
- For an even more vibrant glaze, let it cool for a few minutes before drizzling over the strawberries. This will help it set nicely without running off, giving your pie a beautiful finish.
With these tips in hand, you’re ready to create an exquisite strawberry pie that will impress everyone at your table!
As I served the first slice of strawberry pie at our family gathering, the smiles and satisfied nods reminded me that simple recipes often create the sweetest memories together.
How to Know It’s Done Perfectly
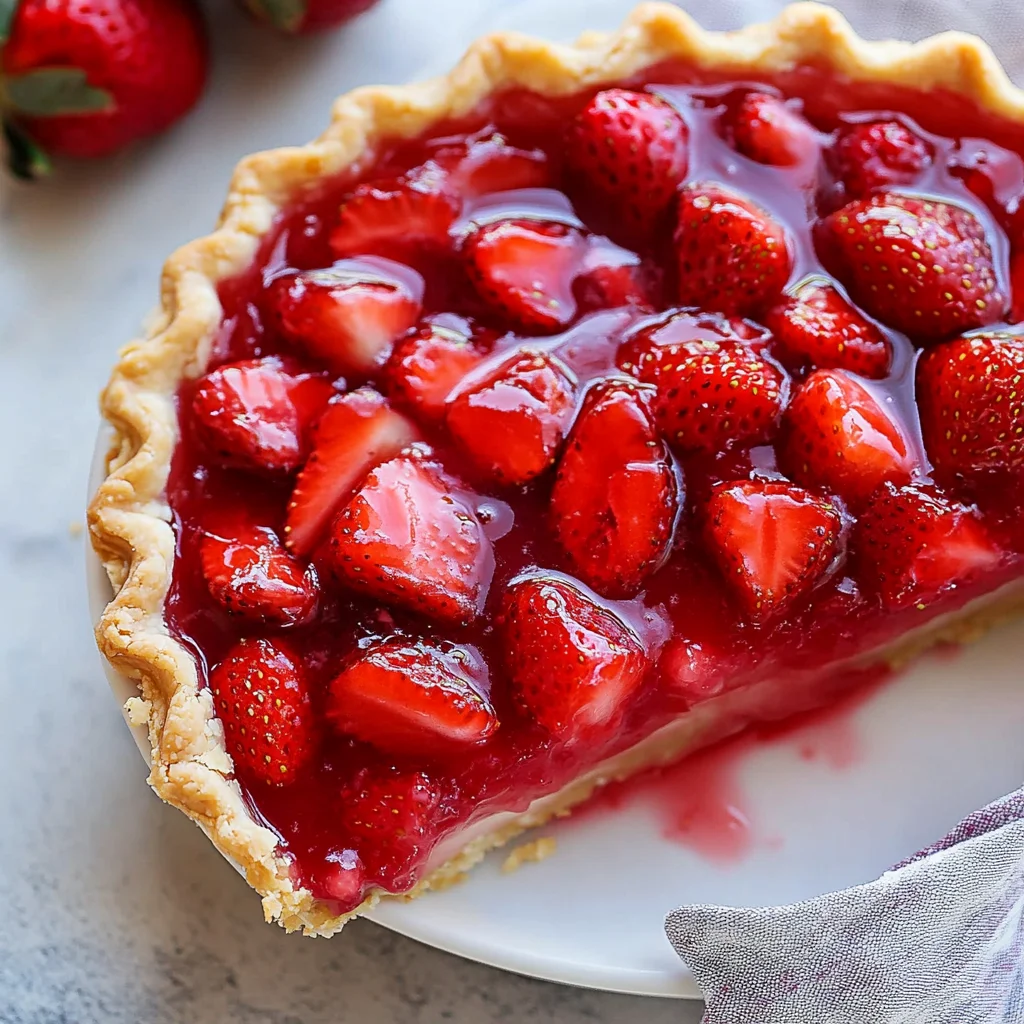
Your strawberry pie is perfectly done when the crust is golden brown, and the filling is glossy and slightly bubbling. The strawberries should be tender yet firm, bursting with sweet flavor. Expect a delightful aroma wafting from it; don’t worry about small variations—each pie is unique and delicious in its own right!
Now that you know how to achieve the perfect finish, let’s explore ways to serve your strawberry pie for an unforgettable experience.
FAQ
What is the best way to store leftover strawberry pie?
To store leftover strawberry pie, cover it with plastic wrap or aluminum foil and refrigerate. It’s best enjoyed within 3-4 days for optimal freshness.
Can I use frozen strawberries for the strawberry pie filling?
While fresh strawberries yield the best flavor and texture for your strawberry pie, you can use frozen strawberries if necessary. Just be sure to thaw and drain them thoroughly before mixing with other filling ingredients.
How do I know when my strawberry pie has set properly?
Your strawberry pie is properly set when the filling is firm to the touch and holds its shape after slicing. Refrigerating it for at least 2 hours will help achieve this consistency.
What variations can I make to the classic strawberry pie recipe?
You can easily customize your strawberry pie by adding different fruits such as blueberries or raspberries, or by incorporating a layer of cream cheese beneath the strawberries for added richness.
Can I make the crust ahead of time for my strawberry pie?
Yes, you can prepare the pie crust ahead of time. After shaping it into a disc, wrap it tightly in plastic wrap and refrigerate for up to 2 days or freeze for longer storage before baking.
Now that we’ve covered some frequently asked questions about making a delicious strawberry pie, let’s dive into tips for perfecting your dessert!