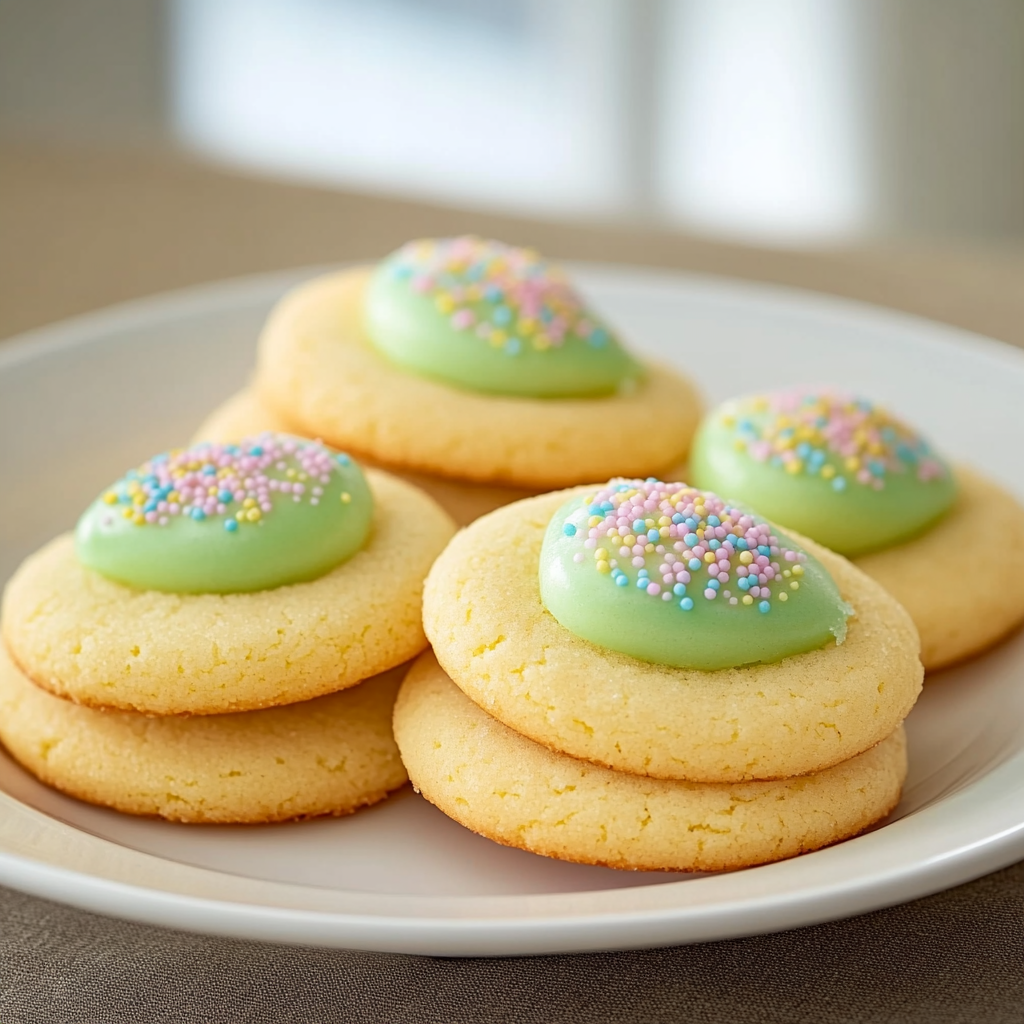
Easter is just around the corner, and that means it’s time to roll up your sleeves and whip up some delightful Easter Egg Sugar Cookies. These treats are not only sweet but also the perfect canvas for creativity. Imagine biting into a soft, chewy cookie adorned with vibrant icing and sprinkles. The moment you take a whiff of vanilla mixed with the sweetness of sugar, you’ll be transported to a world where every day is a sunny spring day.

Growing up, my family had a quirky tradition of hosting an annual cookie decorating competition right before Easter. It was chaos wrapped in laughter as flour flew and icing became an art form. The best part? The ultimate prize was simply bragging rights for the next year! Let me tell you, these cookies are not just about taste; they’re about creating memories that last longer than any chocolate bunny ever could.
Why You'll Love This Recipe
- These colorful Easter Egg Sugar Cookies are easy to prepare and great for all skill levels in baking.
- Their delightful sweetness appeals to kids and adults alike.
- The vibrant colors make them visually stunning on any holiday table.
- They are versatile enough for various occasions beyond just Easter celebrations.
Every time I bake these cookies, my friends and family rave about how adorable they look!

Essential Ingredients
Here’s what you’ll need to make this delicious dish:
- All-Purpose Flour: A crucial base for the cookies; use unbleached flour for better flavor.
- Granulated Sugar: Sweetness overload! Opt for fine sugar to ensure smooth dough.
- Unsalted Butter: Make sure it’s at room temperature for easy creaming with sugar.
- Eggs: Essential for binding; use large eggs for optimal results.
- Baking Powder: This will help your cookies rise beautifully during baking.
- Vanilla Extract: Use pure vanilla extract instead of imitation for richer flavor.
- Salt: Just a pinch enhances the sweetness of your cookies perfectly.
- Icing Colors & Sprinkles: Get creative! Choose your favorite colors to decorate your cookies.
The full ingredients list, including measurements, is provided in the recipe card directly below.
Let’s Make it together
Preheat the Oven!: Start by preheating your oven to 350°F (175°C). This ensures even baking as soon as you’re ready to pop those beauties inside.
Mixing the Dough!: In a large bowl, beat together softened butter and sugar until creamy and fluffy—about 3 minutes. You want that mixture looking like clouds on a sunny day.
Add in Eggs and Vanilla!: Crack in those eggs one at a time while mixing well after each addition. Pour in your vanilla extract—this is where the magic begins!
Sift Together Dry Ingredients!: In another bowl, whisk together flour, baking powder, and salt until well combined—think of it as creating a little cloud of happiness.
Combine Wet and Dry Mixes!: Gradually add your dry mixture into the wet mix while stirring gently until everything comes together like old friends reuniting at a coffee shop.
Chill Out!: Wrap your dough in plastic wrap and refrigerate for at least 1 hour. This helps keep those cute shapes intact when you roll them out later!
Roll Out & Cut Shapes!: On a floured surface, roll out chilled dough to about ¼ inch thick. Use egg-shaped cookie cutters to create your festive shapes; don’t forget to save some dough for taste-testing!
Bake Those Cookies!: Place cutouts on parchment-lined baking sheets and bake in preheated oven for 8-10 minutes or until edges start turning golden brown but centers remain soft.
Cool & Decorate!: Allow cookies to cool on wire racks before decorating with royal icing or fondant—let your creativity run wild with colors!
Now you have it—a delightful batch of Easter Egg Sugar Cookies that are sure to impress family and friends while putting smiles on their faces! Enjoy every bite while reminiscing about all those fun memories you create along the way!
You Must Know
- Easter Egg Sugar Cookies are not just sweet treats; they bring joy to gatherings and brighten up any occasion.
- Their delightful colors and soft texture make them irresistible.
- Don’t be surprised if they disappear faster than you can say “sugar rush!”
Perfecting the Cooking Process
Start by preheating your oven to 350°F (175°C). Cream together the butter and sugar until fluffy, then gradually add eggs and vanilla. Mix dry ingredients separately, combining them before gradually blending into the wet mixture for a smooth dough.

Add Your Touch
Swap out vanilla extract for almond extract for a nutty flavor twist. You can also customize icing colors to match any occasion, ensuring your cookies are as festive as your celebrations!
Storing & Reheating
Store cooled cookies in an airtight container at room temperature for up to one week. For longer storage, freeze them between layers of parchment paper, thawing at room temperature when you’re ready to indulge!
Chef's Helpful Tips
- Use room temperature butter for a smoother dough that mixes evenly.
- Chill the dough for 30 minutes before rolling out to prevent sticking and ensure perfect shapes.
- Experiment with food coloring in your icing to make vibrant designs that impress everyone!
There was a time when my attempts at decorating these cookies ended in colorful chaos. My niece’s laughter echoed through the kitchen as we turned our mishaps into masterpieces, creating memories sweeter than any frosting.
FAQ
How do I achieve the perfect texture for my Easter Egg Sugar Cookies?
To achieve that soft and chewy texture, be sure not to overmix once you add the dry ingredients. Also, remove them from the oven just as they turn golden around the edges but still look slightly undercooked in the center.
Can I use different flavors or extracts in my sugar cookies?
Absolutely! Substitute vanilla extract with lemon or peppermint extract for unique flavor profiles. Just remember that strong flavors might need adjusting based on personal taste preferences.
How can I make my icing dry faster?
To speed up drying time for your icing, use a fan on low setting or place decorated cookies in a cool area away from humidity. This helps prevent smudging while keeping your designs pristine!

Easter Egg Sugar Cookies
- Total Time: 30 minutes
- Yield: Approximately 24 cookies 1x
Description
Easter Egg Sugar Cookies are a delightful spring treat, featuring a soft, chewy texture and vibrant icing. Perfect for festive gatherings and creative decorating fun!
Ingredients
- 2 ¾ cups all-purpose flour
- 1 cup granulated sugar
- 1 cup unsalted butter (room temperature)
- 2 large eggs
- 2 tsp baking powder
- 2 tsp vanilla extract
- ½ tsp salt
- Icing colors & sprinkles (as desired)
Instructions
- Preheat the oven to 350°F (175°C).
- In a large bowl, beat together softened butter and sugar until fluffy.
- Add eggs one at a time, mixing well after each addition, then stir in vanilla extract.
- In a separate bowl, whisk together flour, baking powder, and salt.
- Gradually incorporate the dry ingredients into the wet mixture until fully combined.
- Wrap dough in plastic wrap and refrigerate for at least 1 hour.
- Roll out chilled dough on a floured surface to about ¼ inch thick and cut into egg shapes.
- Place cookies on lined baking sheets and bake for 8-10 minutes until edges are golden but centers remain soft.
- Cool on wire racks before decorating with icing and sprinkles.
- Prep Time: 20 minutes
- Cook Time: 10 minutes
- Category: Dessert
- Method: Baking
- Cuisine: American
Nutrition
- Serving Size: 1 cookie (30g)
- Calories: 150
- Sugar: 8g
- Sodium: 60mg
- Fat: 7g
- Saturated Fat: 4g
- Unsaturated Fat: 2g
- Trans Fat: 0g
- Carbohydrates: 21g
- Fiber: <1g
- Protein: <1g
- Cholesterol: 25mg