Love Letter Cookies are a delightful treat that melts in your mouth, combining the warmth of chocolate with the delicate crunch of a perfectly baked cookie. Imagine biting into a crisp exterior that gives way to a soft, gooey center filled with rich chocolate and a hint of vanilla—pure bliss! The aroma wafting from your oven will have everyone in your house wondering if they’ve just stepped into a bakery.

These cookies are more than just a sweet snack; they carry memories of cozy evenings spent baking with family or surprise gifts for friends. They are perfect for any occasion, whether you’re celebrating love, friendship, or simply treating yourself because you deserve it. Get ready to indulge in an extraordinary flavor experience that will have your taste buds dancing!
Why You'll Love This Love Letter Cookies
- This incredible Love Letter Cookies transforms simple everyday ingredients into restaurant-quality flavors that will blow your mind completely.
- Foolproof recipe techniques guarantee perfect results every single time, making even novice cooks feel like professional chefs instantly.
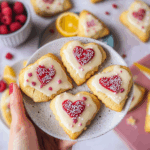
- Stunning visual appeal with gorgeous colors and mouthwatering aromas creates the ultimate Instagram-worthy dish for any special occasion.
- Endlessly adaptable for different dietary needs while working beautifully for meal prep, date nights, or entertaining large groups effortlessly.
What You’ll Need

Here’s what you’ll need to make this delicious Love Letter Cookies:
- All-Purpose Flour: This forms the base of our cookies—choose unbleached flour for better flavor and texture.
- Granulated Sugar: This sweetens our cookies and helps achieve that lovely crispy edge.
- Brown Sugar: For added moisture and a hint of caramel flavor that makes these cookies irresistible.
- Baking Powder: The leavening agent that gives our cookies that perfect puffiness.
- Salt: A pinch enhances all the flavors beautifully—don’t skip it!
- Unsalted Butter: Bring this to room temperature for easy mixing; it adds richness and flavor.
- Eggs: Just one large egg is needed to bind everything together.
- Vanilla Extract: A splash of this magic potion elevates our cookie’s flavor profile immensely.
- Chocolate Chips: Use semi-sweet or dark chocolate chips according to your preference; they’re the star of the show!
The full ingredients list, including measurements, is provided in the recipe card directly below.
Cooking Instructions
Follow these simple steps to prepare this delicious Love Letter Cookies:
Step 1: Preheat the Oven
Preheat your oven to 350°F (175°C). Line two baking sheets with parchment paper so our cookies don’t stick—because nobody likes cookie casualties!
Step 2: Mix Dry Ingredients
In a bowl, whisk together all-purpose flour, baking powder, and salt until well combined. This ensures an even distribution of those necessary leavening agents; we want fluffy cookies, not flat ones!
Step 3: Cream Butter and Sugars
In another bowl, cream together unsalted butter, granulated sugar, and brown sugar until light and fluffy—about three minutes should do it. Think of it as giving your butter a nice spa day!
Step 4: Add Eggs and Vanilla
Beat in one egg and vanilla extract until fully incorporated. Trust me; this step adds magic! Your batter will smell divine at this point.
Step 5: Combine Wet and Dry Ingredients
Gradually add the flour mixture to the wet ingredients while mixing on low speed. Stop when just combined—overmixing is a big no-no if you want soft cookies!
Step 6: Fold in Chocolate Chips
Gently fold in those glorious chocolate chips using a spatula until evenly distributed throughout the dough. Now that’s what I call cookie happiness!
Step 7: Shape and Bake
Scoop tablespoon-sized amounts of dough onto prepared baking sheets about two inches apart. Bake in preheated oven for about ten to twelve minutes or until the edges are golden brown but centers still look soft.
Transfer to wire racks to cool slightly before devouring—you wouldn’t want burnt tongues!
Now you’ve got yourself some amazing Love Letter Cookies that are sure to win hearts (and stomachs) everywhere! Serve them warm with a glass of milk or pack them up as delightful gifts. Enjoy every gooey bite!

You Must Know About Love Letter Cookies
- This showstopping Love Letter Cookies delivers restaurant-quality results using simple ingredients you probably already have at home.
- The perfect balance of textures and flavors creates an unforgettable dining experience that will have everyone asking for seconds.
- Picture-perfect presentation with vibrant colors makes this dish absolutely Instagram-worthy and guaranteed to impress any dinner guest.
- Incredibly versatile recipe that works beautifully for weeknight dinners, meal prep, special occasions, or even outdoor entertaining sessions.
Perfecting Cooking Process
To achieve the best results with Love Letter Cookies, start by mixing your dry ingredients. While they mingle, cream the butter and sugar together until fluffy. Then, gradually incorporate the dry mix into the wet ingredients for a smooth dough.
Flavor Your Way
Don’t hesitate to get creative with your Love Letter Cookies! Add nuts like walnuts or pecans for crunch, swap in different extracts like almond or coconut, or even sprinkle in some chocolate chips for a delightful twist.
Storing & Reheating
To maintain freshness, store your Love Letter Cookies in an airtight container at room temperature for up to one week. If reheating is necessary, pop them in the microwave for a few seconds to bring back their delightful softness.
Chef's Helpful Tips for Love Letter Cookies
- This professional-quality Love Letter Cookies relies on precise timing and temperature control to achieve restaurant-standard results consistently.
- Master the art of mise en place by prepping all ingredients beforehand, ensuring smooth execution and preventing any last-minute cooking disasters.
- The secret lies in layering flavors throughout the cooking process rather than seasoning only at the end for maximum depth.
- Pro tip: let the finished dish rest for optimal texture and flavor development before serving to hungry guests waiting eagerly.
When I first attempted these Love Letter Cookies, my friends devoured them so quickly that I barely had time to snap a photo. Their laughter filled the kitchen as they begged for “just one more cookie.” It was a sweet moment I’ll cherish forever.

FAQs
What are Love Letter Cookies?
Love Letter Cookies are delightful, thin, and crispy treats that often feature a sweet filling. They are typically made from a batter that includes flour, sugar, and coconut, resulting in a light texture. The cookies are rolled around a filling of sweetened condensed milk or chocolate, giving them an irresistible flavor. These cookies are popular for special occasions and celebrations, as they carry a romantic appeal due to their name. Making Love Letter Cookies is an enjoyable activity that can be shared with friends and family, making them perfect for gatherings.
How do you make Love Letter Cookies?
To make Love Letter Cookies, start by preparing the batter using flour, sugar, and coconut flakes. Once mixed, spread the batter thinly on a baking sheet and bake until golden brown. After cooling slightly, cut the cookies into rectangles and place your desired filling in the center. Roll each cookie tightly around the filling to create a lovely cylindrical shape. Allow them to cool completely before serving. This straightforward process allows anyone to enjoy homemade Love Letter Cookies in no time.
What variations can I try with Love Letter Cookies?
You can experiment with various fillings for Love Letter Cookies to enhance their flavor profile. Consider using flavored creams like vanilla or almond instead of traditional sweetened condensed milk. For a fruity twist, try adding fruit preserves or jams such as raspberry or peach. You can also incorporate different spices into the batter for added depth of flavor. These variations ensure that your Love Letter Cookies will always be unique and exciting for your taste buds.
How should I store Love Letter Cookies?
To maintain the freshness of your Love Letter Cookies, store them in an airtight container at room temperature. Proper storage helps prevent them from becoming stale or losing their crispiness. If you plan to keep them for an extended period, consider refrigerating them in an airtight bag. However, allow them to come back to room temperature before serving to enjoy their original texture and flavor fully. With proper care, these delightful cookies can last for several days.
Conclusion
In conclusion, making Love Letter Cookies is a delightful culinary adventure that brings joy to any occasion. Their unique combination of crispy texture and sweet fillings makes them irresistible treats loved by many. With simple ingredients and easy preparation steps, anyone can create these charming cookies at home. Remember to explore various fillings and storage methods to keep your cookies fresh longer. Enjoy sharing these delightful bites with loved ones while celebrating special moments with Love Letter Cookies!
Love Letter Cookies
- Total Time: 27 minutes
- Yield: Approximately 24 cookies 1x
Description
Love Letter Cookies are a heavenly treat that will elevate any occasion. With a crispy exterior and a rich, gooey chocolate center, each bite melts in your mouth, leaving you craving more. These delightful cookies are easy to make and perfect for sharing with friends and family or enjoying as a personal indulgence.
Ingredients
- 1 ½ cups all-purpose flour
- ½ cup granulated sugar
- ½ cup brown sugar, packed
- 1 tsp baking powder
- ¼ tsp salt
- ½ cup unsalted butter, softened
- 1 large egg
- 1 tsp vanilla extract
- 1 cup semi-sweet chocolate chips
Instructions
- Preheat the oven to 350°F (175°C) and line two baking sheets with parchment paper.
- In a bowl, whisk together flour, baking powder, and salt until combined.
- In another bowl, cream together butter, granulated sugar, and brown sugar until fluffy (about 3 minutes).
- Beat in the egg and vanilla extract until fully combined.
- Gradually mix the dry ingredients into the wet mixture on low speed until just combined.
- Gently fold in chocolate chips using a spatula.
- Scoop tablespoon-sized amounts of dough onto prepared baking sheets, spacing them about two inches apart. Bake for 10-12 minutes or until edges are golden brown.
- Prep Time: 15 minutes
- Cook Time: 12 minutes
- Category: Dessert
- Method: Baking
- Cuisine: American
Nutrition
- Serving Size: 1 serving
- Calories: 150
- Sugar: 10g
- Sodium: 85mg
- Fat: 7g
- Saturated Fat: 4g
- Unsaturated Fat: 3g
- Trans Fat: 0g
- Carbohydrates: 20g
- Fiber: 1g
- Protein: 2g
- Cholesterol: 15mg


